

Two Step Staircase Design: Guide
Two Step Staircase Design: purpose and practical scope
Two Step Staircase Design: Guide is a construction guide to two step staircase design. It explains the term, its project role, design coordination, safe work boundaries, and the records needed to review a real installation or maintenance decision. Begin with the actual facility, route, equipment, drawing revision, and user task. A familiar detail or web example cannot replace a current site measurement or approved design.
The first decision is to clarify what two step staircase design refers to on this project. Similar trade words can describe different components, while one assembly may combine structure, walking surface, access, guarding, and building services. Identify the intended function, whether the work is permanent or temporary, the people who use it, and who is responsible for design and acceptance. Then check the proposed detail against adjacent work rather than reviewing it in isolation.
How the topic works in a building
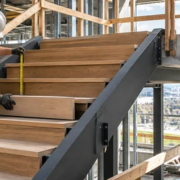
A stair is a coordinated sequence of treads, risers, stringers or supporting structure, landings, handrails, guards, and connections between levels. A banister or bannister commonly refers to a rail assembly, but trade terms differ and do not alone identify every required component. Define whether the article topic concerns a structural part, walking surface, finish, guard, or handhold. Confirm occupancy, route function, user needs, dimensions, supports, and applicable code before choosing a detail.
Typical uses and project context
Use conditions shape the correct detail. A private stair, an accessible entrance route, an industrial maintenance platform, an elevator pit, and a temporary work route have different users and operating conditions. Ask whether the route carries people, tools, equipment, or service access; how often it is used; whether it is exposed to weather or water; and how occupants reach it. Identify deliveries, cleaning, inspection, emergency movement, and future replacement before fixing the layout.
Planning information to collect
For two step staircase design, organize these inputs before estimating or approving work. Missing details should be logged as questions, not filled with assumptions. Keep measurements, units, revisions, and responsible reviewers visible so each trade works from the same baseline.
- Current drawings, revisions, specifications, site measurements, and the responsible approval owner.
- Users, route purpose, occupancy, access frequency, loads, delivery or maintenance tasks, and operating conditions.
- Adjacent structure, openings, utilities, doors, finishes, fire or waterproofing assemblies, and temporary works.
- Material data, fixing details, tolerances, lead times, inspection access, and replacement strategy.
- Applicable local codes, accessibility obligations, workplace rules, permits, and project acceptance criteria.
- Known defects, assumptions, exclusions, change history, and evidence needed for handover.
Design and coordination
Check total rise, available horizontal run, headroom, landing positions, opening size, stair width, direction changes, handrail and guard locations, and connection to the floor system. Keep risers and treads consistent within the flight and coordinate the first and last steps with finished floor levels. Consider how users carry items and whether the route is part of egress or an accessible facility. Draw the stair in plan and section, then check it against the surrounding structure and finishes.
Materials and connection details
Material selection affects stiffness, slip resistance, wear, sound, fire performance, moisture response, maintenance, and appearance. Wood, concrete, masonry, steel, and glass assemblies have different support and connection needs. A nominal lumber size is not the finished dimension; verify actual size, grade, span, support, and fastening from approved design information. Coordinate coatings, nosings, adhesives, anchors, and adjacent finishes so that the completed assembly remains inspectable and repairable.
Source-specific considerations
Stair geometry and component fit
For Stair geometry and component fit, map each component to its purpose and interface with the rest of the assembly. Identify which part supports load, guides movement, protects an edge, enables access, or provides a grasping surface. Confirm attachment substrate and replacement access. A component name is not a design specification; drawings should show location, material, dimensions, connection, and inspection responsibility.
Material and connection choices
For Material and connection choices, specify the actual product, grade, finish, support, fixing, exposure, and maintenance expectation rather than relying on a generic material name. Compare durability, slip behavior, moisture response, corrosion or wear, installation access, and compatibility with adjacent components. Check samples and submittals against drawings. A material substitution may change weight, connection, fire behavior, or upkeep, so review its system effect before approving it.
Coordination with openings and finishes
For Coordination with openings and finishes, define the question the heading addresses, the relevant location, the controlling drawing or specification, and the person who approves the detail. Check how it connects to adjacent work and how it will be inspected after installation. Record assumptions and open decisions instead of treating a typical detail as universal. This keeps two step staircase design tied to the actual project rather than to a generic example.
Inspection and handover
For Inspection and handover, consider the complete user path, foreseeable task, surrounding work, and maintenance condition. Look for changes in level, obstructions, loose parts, inadequate lighting, moisture, and blocked access. Apply the requirements that govern this facility and activity, and document who verified them. If a defect affects stability or safe passage, control access and obtain a qualified assessment before routine use.
Practical construction and review sequence
A reliable stair workflow starts with verified floor-to-floor measurements and finished floor elevations. Coordinate drawings and shop details, mark the opening and supports, confirm bearing and attachment, and inspect concealed work before closing it. Install in the specified sequence and protect unfinished edges. Before use, verify uniformity, secure rails, clear headroom, stable landings, finish transitions, and required inspections. Any field adjustment that changes geometry or support must be approved and documented.
- Set the scope and controlling document; label the revision, location, purpose, and decision owner.
- Measure existing and proposed conditions; record method, units, photos, and unresolved conflicts.
- Coordinate structure, access, services, finishes, drainage, fire protection, and adjacent trades.
- Review products, shop drawings, fasteners, load path, installation sequence, and temporary protection.
- Approve the detail through the responsible design or facility process before procurement or field change.
- Inspect concealed and completed work at planned hold points; record deviations and corrective actions.
- Verify safe use, clear route, stable connections, maintenance access, and required sign-off.
- Update as-built records, product data, inspection logs, open items, and the next maintenance owner.
At each hold point, compare the installed condition with the approved drawing and record location, date, inspector, evidence, and disposition. For two step staircase design, do not cover a connection, support, waterproofing layer, service, or anchor before its planned inspection. If the field condition differs, pause the affected work, protect users and workers, obtain a reviewed resolution, and update the drawing or record before the crew proceeds.
Safety, accessibility, and code review
The governing requirements depend on whether a stair is permanent or temporary, its occupancy and egress role, and whether accessibility rules apply. ADA standards cover specified accessible-route and stairway conditions in covered facilities; OSHA has separate requirements for construction work. Check the current locally adopted building and fire codes and the project’s approved drawings. Uniformity, secure handrails, guards, clear routes, slip resistance, and safe temporary protection should be reviewed by qualified professionals.
In the United States, the ADA Standards address specified accessible routes, ramps, stairways, and handrails in covered settings. OSHA has separate requirements for construction work, including stairways and ladders. Building, fire, elevator, and local codes may also apply. Applicability depends on facility, occupancy, alteration, route function, and project phase. Verify the current adopted requirements and approved plans with the responsible design professional and authority having jurisdiction; this guide is not a compliance determination.
Inspection, maintenance, and handover
Inspect treads, risers, stringers, connections, handrails, guards, landings, finishes, and the surrounding wall or floor interface. Look for movement, cracks, rot, corrosion, moisture, worn nosings, loose fasteners, uneven transitions, and blocked headroom. Record defect location and change over time. Cleaning and coatings should fit the material. A repair that affects support or geometry needs appropriate review; do not conceal a recurring defect with filler or trim.
A useful handover for two step staircase design lets a facilities team understand what was built, what was inspected, what restrictions apply, and who owns maintenance. Keep approved drawings, product data, inspection records, photos of concealed work, changes, warranties, and open items together. Include access and isolation instructions for equipment or service spaces. If an issue reappears, compare it with prior records and investigate the cause rather than repeating an undocumented patch.
Common mistakes to prevent
- Copying a typical dimension or online detail without checking the adopted code, equipment, occupancy, and project conditions.
- Changing a tread, rail, ramp, shaft, opening, or platform detail without reviewing its connection and adjacent systems.
- Leaving temporary access, an open edge, pit, hatch, or unfinished route without protection and controlled access.
- Comparing materials by appearance or name while ignoring grade, support, fixing, moisture, slip, corrosion, and maintenance.
- Covering anchors, waterproofing, framing, or services before the responsible inspection and record are complete.
- Treating a cosmetic patch as a structural or accessibility correction when the underlying cause remains unknown.
When a discrepancy is found, describe the location and effect in plain language. State whether the issue affects safe passage, structural support, accessibility, water control, equipment access, finish, or future maintenance. Set an owner and response date. Do not combine unrelated observations into one vague punch-list item; a specific record is easier to review and close.
Planning time, materials, and change impact
Price and schedule depend on field access, measurement confidence, finish level, support conditions, permits, fabrication, lead time, weather, temporary protection, inspection, and coordination with other trades. A material allowance or generic productivity figure is not a project quotation. Compare options using the same scope, specification, delivery point, installation sequence, exclusions, and acceptance criteria. Record the date and source of every quote and show whether it includes removal, disposal, testing, cleanup, and handover.
When a change is proposed, log its reason, drawing reference, location, quantity, material and labor effect, schedule impact, affected trades, review owner, and approval status. Keep the original baseline visible. Separate confirmed scope from provisional work and contingency. This makes it easier to explain a cost or duration change without hiding it in a general allowance and helps the project avoid ordering materials for an unapproved detail.
Illustrative project scenario
Consider a renovation where the existing two step staircase design differs from the plan after finishes are removed. The team records the actual dimensions, photographs concealed conditions, protects the route, and checks the current drawing and product submittal. The designer reviews whether the support, clearance, access, and adjacent systems remain suitable. The contractor prices the approved correction as a distinct change, updates procurement and schedule, and marks the inspection point before the work is covered. At handover, the owner receives the revised detail and maintenance note. The example shows a review method, not a design prescription or quoted price.
Frequently asked questions
What is the difference between a tread and riser?
The tread is the walking surface; the riser is the vertical face or measured rise between successive treads. Check project documents and applicable local requirements; conditions vary by facility, scope, and jurisdiction.
What does a stringer do?
It supports or carries stair components; its shape, material, connection, and capacity must match the design. Check project documents and applicable local requirements; conditions vary by facility, scope, and jurisdiction.
Are banister and bannister different components?
They are spelling variants in common use; drawings should specify the handrail, guard, balusters, posts, and connections explicitly. Check project documents and applicable local requirements; conditions vary by facility, scope, and jurisdiction.
Can one stair dimension fit every building?
No. Use the applicable code, occupancy, stair function, approved design, and field measurements for the project. Check project documents and applicable local requirements; conditions vary by facility, scope, and jurisdiction.
What should be checked before using a stair?
Stable treads, consistent geometry, secure rails and guards, clear headroom, suitable lighting, and an unobstructed route. Check project documents and applicable local requirements; conditions vary by facility, scope, and jurisdiction.
Related stairs, ramps, and access resources
For related topics in this category, see Concrete Staircase Construction: Guide, Brick Stair Construction: Guide, Stairs And Walkways: Guide, Spiral Staircase Calculator, Stair Calculator. Each resource addresses its own scope; verify measurements and acceptance requirements for the project at hand.
Conclusion
A sound decision about two step staircase design starts with a defined purpose, current field information, coordinated drawings, and a safe sequence. Review interfaces and requirements before work, document changes, inspect concealed details, and leave clear maintenance records. This keeps the finished route or component understandable and useful through later operation and repair.





Leave a Reply
Want to join the discussion?Feel free to contribute!