
Case Opening Trim: A Practical Construction Guide
Case opening trim, usually called casing, is the finish material that frames a door or window opening. It covers the joint between the jamb and the finished wall, protects the edge, and creates a visual border. Casing does not normally support the wall or hold the door; framing, the jamb, hinges, and approved fasteners perform those jobs. A clean casing installation depends on accurate measurements, consistent reveal, suitable backing, and joints fitted to the actual wall and opening.
Door and window casing may be flat stock or a molded profile. It can be painted, stained, or made from a synthetic material suited to the location. The right choice depends on the architectural style, jamb depth, wall finish, moisture exposure, and nearby trim. Before ordering, inspect the opening and decide how the casing will meet baseboard, crown, stool, apron, flooring, and adjacent wall details.
Parts of a cased opening
A typical door opening includes two side casings and a head casing. The casing overlaps the jamb by a consistent reveal, leaving the hinge and latch hardware unobstructed. The outer edge extends over the wall to conceal the installation gap. Some designs add a backband, plinth block, rosette, or decorative head piece. These features alter the dimensions and should be included in the layout before cuts are made.
A window casing can include side and head pieces, plus a stool and apron at the bottom. Some windows use a drywall return or a manufactured extension jamb instead of conventional casing. The sill and flashing details control water at exterior windows; interior trim must not cover weep openings or create a path for moisture to become trapped. Use the window manufacturer’s installation details for exterior interfaces.
The jamb is the frame within the wall opening. Its depth should match the wall assembly or be extended with jamb extensions. Casing cannot cover a large depth mismatch without looking awkward or reducing the reveal. Measure the jamb at several points because older openings can be out of square or twisted.
Choose the profile and material
Flat stock creates a simple contemporary frame and is often easier to fit against uneven walls. Molded casing adds a shaped profile that can coordinate with baseboard and crown. A backband can add dimension to a flat casing. Profiles vary in width, projection, and edge detail; bring a sample into the room to compare against the door, wall height, and other trim.
Solid wood can be stained or painted and may be milled in many species. It moves with changes in humidity, so long joints and corners need careful fitting. MDF is smooth and consistent for painted interior trim, but it should be protected from prolonged moisture unless the exact product is rated for it. Finger-jointed wood and other engineered products can provide long lengths with fewer defects. Cellular PVC or composite casing may suit some damp or exterior uses, but fastening and movement requirements are product-specific.
For a bathroom or exterior opening, select material and finish for the exposure. Do not use a water-sensitive interior profile where repeated wetting is expected. If the opening has a history of leakage, repair the flashing and wall condition before installing new trim. Trim replacement alone will not correct water entry.
Measure the opening and establish a reveal
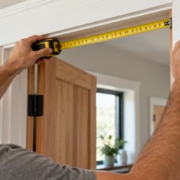
Measure the height of each side from the finished floor or sill to the head jamb. Check that the floor finish is installed or account for its final thickness. Measure the head width and note whether the head casing sits between the side pieces or overlaps them. Both are common design approaches, but the cut lengths differ. Make a quick sketch with dimensions and label which edge is the reference face.
Choose a reveal, the small exposed margin between casing and jamb, and keep it consistent. A marking gauge or spacer block can set the reveal faster than measuring every point. Check the jamb for twists and out-of-square conditions before cutting. A casing that follows a crooked jamb may not align with the wall; sometimes the jamb needs correction or the trim needs to be scribed.
Check that the door swings without hitting the casing and that hinge barrels, strike plates, closers, or security hardware have clearance. For windows, make sure blinds, shades, and operating hardware remain accessible. At adjacent doors, align head casing where the design calls for it. The visual top line can make an otherwise simple installation look coordinated.
Plan joints, corners, and returns
Casing corners can be mitered or assembled with square-cut pieces depending on the profile and style. A miter matches the profile around the corner but can open as wood moves or if the wall angle is inaccurate. A square head casing placed over the side casings is simpler and may suit a Craftsman-style detail. Use the architectural design consistently across nearby openings.
Measure the actual corner angle and test the cut on short offcuts. Small deviations from 90 degrees can make a miter visibly open. For a molded profile, support the material and orient it correctly in the saw so the cut matches the installed position. Cope or return detail may be appropriate at a terminal end. Avoid leaving raw end grain where it will be visible.
At the bottom, casing can die into baseboard, meet a plinth block, or terminate near the floor. Choose a detail that works with the profile and the flooring clearance. A thin sliver at the floor or a notch that exposes the wall can be avoided through early measurement. If the flooring floats, the trim must not clamp it.
Install casing step by step
Confirm the opening is stable, the jamb is secured, and the wall finish is complete enough to receive trim. Mark stud locations and check for wiring or plumbing before driving nails. Cut a test piece and verify the reveal and length. Install the first side, then the head and the other side according to the chosen overlap detail. Use a level and consistent spacers to keep reveals uniform.
Fasteners should penetrate the jamb and suitable wall framing or backing where required. Avoid placing nails near fragile edges, and predrill dense or brittle stock if the manufacturer recommends it. Do not force casing flat against a wavy wall by overdriving fasteners; scribe the piece, add backing, or use a suitable flexible finish joint. The door jamb should remain plumb and the door should operate freely after each side is secured.
At each joint, dry-fit before fastening. A small gap at a painted joint can sometimes be filled, but a poor miter or twisted casing should be recut. Use a compatible filler for nail holes and a paintable sealant only at appropriate wall interfaces. Stained wood generally needs a tighter fit because filler and caulk can remain visible.
Finishing painted or stained casing
Fill nail holes and sand the surface with a grit suitable for the material and finish. Seal cut ends where required. Prime bare wood, MDF, or engineered trim with the appropriate primer, then apply the specified topcoat. Some factory-primed products still need edge sealing or a finish coat. Follow the product’s recoat times and environmental limits.
For stain-grade casing, test the full finish on an offcut from the same batch. End grain and face grain absorb stain differently. Use the finish manufacturer’s conditioner or sealer only when recommended. Protect adjacent glass, wall paint, and flooring. A sample joint helps confirm the selected filler and finish before the entire opening is complete.
Inspect the finished assembly under normal room lighting. Check for consistent reveals, aligned head heights, visible gaps, rough cuts, and door interference. Correct defects before the final coat rather than relying on caulk to hide the geometry.
Common problems and repairs
Open joints may come from inaccurate cuts, movement, weak fastening, or an opening that shifted. Identify the cause before filling. If the casing is loose, refasten it into suitable backing and verify that the jamb is secure. A split piece may need replacement, particularly at a high-visibility or impact area. Swollen MDF or soft wood near a window signals moisture that should be traced to its source.
Uneven reveal often comes from a twisted jamb or inconsistent layout. Small variation may be corrected during installation by adjusting the trim, but large variation can require jamb work. Casing that rubs a door may need a clearance correction, not simply more sanding at one spot. Recheck door operation after any repair.
For historic or custom profiles, a trim supplier or millwork shop may be able to match a short sample. Keep a piece of the original casing and document its dimensions. When replacing one piece, match the width, projection, profile, and finish rather than relying on a name that may differ by supplier.
Estimating casing quantities
Estimate each opening separately, adding both side legs and the head piece, then account for the cut plan, stock lengths, miters, and waste. Windows with stools and aprons require additional linear footage and sometimes a different profile. Include backband, blocks, returns, fasteners, filler, primer, and paint as separate items. Long stock may reduce joints but can be harder to transport and handle.
Labor includes measurement, cutting, fitting, fastening, filling, sanding, and finishing. Older openings may need jamb repair or wall patching. Add time for custom profiles and repeated reveals. A written takeoff helps compare bids that otherwise may omit the same details.
Frequently asked questions
Is door casing structural?
No, casing is generally finish trim. The jamb, hinges, fasteners, and wall framing provide the opening’s function and support.
How wide should casing be?
Choose a width proportionate to the opening and coordinated with the room’s other trim. The project’s design and existing conditions should guide the selection.
Can casing cover a large wall gap?
It may conceal a normal installation gap, but a large or irregular gap can indicate poor framing or a jamb problem. Repair the opening before adding trim.
Should casing touch the floor?
It should meet the intended baseboard or flooring detail cleanly while preserving required flooring movement clearance.




Leave a Reply
Want to join the discussion?Feel free to contribute!