
Window Assembly in Construction: Meaning and Use
window assembly in construction describes a window feature or condition within a complete opening. Frame, sash, glass, sill, head, jamb transitions, flashing, and interior finish all affect operation and water management. Confirm the intended system in the drawings and approved product information; the term by itself does not guarantee a size or performance.
Introduction to Window Assembly
Key Components of Window Assembly
1. Window Frame
The window frame is the structural component that supports the window unit. It is typically made from materials such as wood, vinyl, aluminum, or composite materials. The frame must be durable and capable of withstanding various environmental conditions. Proper selection and installation of the window frame are crucial for the overall stability and performance of the window system.
2. Sash
The sash is the part of the window that holds the glass panes. It can be either a single or double-hung unit, depending on the design. The sash must be properly aligned and secured within the frame to ensure smooth operation and prevent air or water leaks.
3. Glass Panes
Glass panes are integral to window assembly, providing insulation, protection from the elements, and natural light. The choice of glass, whether single, double, or triple-pane, affects the window’s thermal performance and sound insulation. Low-E coatings and argon gas fills can enhance energy efficiency.
4. Weatherstripping
Weatherstripping is used to seal gaps between the window sash and frame. This component helps in preventing air and water infiltration, thus improving the energy efficiency of the window. Various types of weatherstripping materials include rubber, foam, and silicone.
5. Hardware
Window hardware includes components such as hinges, locks, cranks, and handles. These elements are essential for the operation and security of the window. High-quality hardware ensures smooth operation and extends the lifespan of the window.
The Window Assembly Process
1. Preparation and Measurements
Accurate measurements are crucial for successful window assembly. This involves measuring the window opening to ensure that the new window will fit correctly. Proper preparation includes checking the structural integrity of the window opening and making any necessary repairs or adjustments.
2. Frame Installation
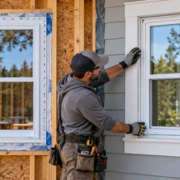
The frame installation is the first step in window assembly. The frame must be securely anchored to the building structure, ensuring it is level and plumb. This process typically involves using shims to adjust the frame’s position and fasteners to secure it in place.
3. Sash and Glass Installation
Once the frame is installed, the next step is to insert the sash and glass panes. The sash must be aligned within the frame and secured with appropriate hardware. The glass panes are then installed into the sash, ensuring they are properly sealed and free from gaps.
4. Weatherstripping and Sealing
Weatherstripping is applied to seal any gaps between the sash and frame. This step is crucial for preventing drafts and water infiltration. Additionally, caulking is used around the perimeter of the window to provide a final seal and enhance energy efficiency.
5. Hardware Installation
Finally, hardware components such as locks, handles, and hinges are installed. This ensures the window operates smoothly and securely. Proper installation of hardware is essential for the window’s functionality and security.
Common Challenges and Solutions
1. Misaligned Frames
Misalignment of the window frame can lead to operational issues and poor sealing. This can be addressed by carefully measuring and adjusting the frame during installation. Using shims and ensuring the frame is level and plumb will help prevent misalignment.
2. Air and Water Leaks
Air and water leaks can occur if the window assembly is not properly sealed. To prevent this, ensure that weatherstripping and caulking are correctly applied. Regular inspections and maintenance can also help identify and address leaks.
3. Glass Breakage
Glass breakage can be caused by various factors, including impacts or thermal stress. Choosing durable glass and ensuring proper handling during installation can minimize the risk of breakage. Regular inspections can help detect and address potential issues early.
Maintenance Tips for Window Assembly
1. Regular Cleaning
Regular cleaning of windows helps maintain their appearance and functionality. Use appropriate cleaning agents and methods to avoid damaging the glass or frame. Regular cleaning also allows for early detection of any issues.
2. Inspecting Weatherstripping
Inspect weatherstripping periodically to ensure it remains intact and effective. Replace any worn or damaged weatherstripping to maintain energy efficiency and prevent drafts.
3. Lubricating Hardware
Lubricate window hardware regularly to ensure smooth operation. This includes hinges, locks, and handles. Proper lubrication helps prevent wear and tear and extends the lifespan of the hardware.
Conclusion
Effective window assembly is vital for ensuring the functionality, energy efficiency, and aesthetic appeal of a building. By understanding the key components, process, and common challenges, construction professionals can achieve high-quality results. Proper installation, regular maintenance, and attention to detail are essential for the long-term performance of window systems.
Window Assembly in Construction: Meaning in Context
The project context determines whether window assembly in construction names a component, an arrangement, a finish, or a field condition. Nearby terms may describe related parts without meaning the same thing. In technical use, locate the term in the relevant detail and note the component it modifies. That prevents a familiar word from being treated as a complete specification. Record the location and intended function when discussing it with the design or installation team.
For this topic, separate the named element from the full window and wall assembly. The assembly may include the frame, sash, glazing, hardware, flashing, sill, and wall layers. Those neighboring pieces influence fit and performance, while the term itself describes only one part of the decision. If a note is ambiguous, compare the schedule, section, and product information before ordering or changing work. Keep the window assembly context reference consistent between the schedule and the installed condition.
How the window and wall assembly works
Review window assembly in construction as part of the way the window and wall assembly connects to adjoining construction. The relevant interfaces include operation, glazing retention, drainage, flashing, insulation, and trim. A component can look correct on its own and still conflict with another layer, finish, or moving part. The detail should make clear which materials meet, which item supports another, and where movement or drainage is expected.
These relationships also affect the sequence of work. Framing, finishes, hardware, glazing, and sealants may be installed by different trades. Confirm who provides each transition and when it can be inspected. Where the drawings show a concealed connection, photograph or record it before covering it if the project requires that evidence. Use the window assembly context detail to confirm which trade owns the connection and review.
Reading Plans, Schedules, and Details
Begin with the plan to locate the opening or component, then compare the elevation, section, enlarged detail, schedule, and written specification. Check that each document uses consistent terminology and dimensions. A schedule may identify a type while the detail defines its connection; neither should be read without the other. Product submittals need to correspond to the exact location and configuration being reviewed. For window assembly context, compare approved product information with measured site conditions.
For existing work, compare the record drawings with field conditions instead of assuming they are exact. Measure the relevant surfaces, note wall or floor layers, and record any visible movement or previous repair. If a dimension or description conflicts, request a documented clarification before fabrication or installation. This step is especially important when the work affects structure, weather control, fire protection, or a required clear path. A field note for window assembly context should identify the interface, not just a visible symptom.
Selection and Coordination
Choose a product or detail around the documented use of the space, expected exposure, appearance, maintenance access, and performance criteria. For window assembly in construction, ask what the completed assembly must do and which adjacent components enable that result. Similar-looking products may differ in operation, material compatibility, or approved use, so compare the actual submittal with the project requirements rather than relying on a broad product label.
Coordinate dimensions and interfaces before purchase. Check daylight, view, ventilation, privacy, weather protection, and serviceability along with available clearances and the planned finish layers. Samples or a mockup can help resolve appearance and workmanship where words are not precise enough. Document accepted substitutions and carry them into the current schedule or detail so that the installer and future maintenance team can identify what was approved. The handoff for window assembly context should preserve the final approved configuration.
Installation Sequence and Field Checks
Use the approved installation instructions for the actual substrate and system. Before work begins, confirm the site condition, reference dimensions, required support, and materials that will be concealed. Keep the sequence consistent with the detail so that flashing, seals, fasteners, or retainers remain continuous. A generic installation habit should not replace a product-specific instruction or a project requirement. For window assembly context, verify the component and location against the latest project detail.
During the work, check opening dimensions, frame alignment, sash operation, seals, and clear drainage paths. Verify alignment and fit before adding trim or closing the surrounding construction. If a part must be forced into place, if a gap changes across the opening, or if a connection does not match the approved drawing, stop and resolve the discrepancy. Record the correction and confirm that it does not obstruct drainage, movement, access, or future service. Keep the window assembly context reference consistent between the schedule and the installed condition.
Performance and Diagnosis
Common concerns for this assembly include binding sashes, drafts, condensation, water marks, and damaged seals. These symptoms can have different causes, so locate where the condition begins and whether it changes with use, weather, or adjacent work. Check the component and its interfaces, not just the visible surface. Water marks, for example, may originate above or beside the point where they appear. At the window assembly context location, record field variations before adjacent work is completed.
Use inspection or testing methods specified for the project when visual review alone cannot establish performance. A cosmetic repair may hide a gap without correcting support, alignment, or a failed transition. If the condition may affect safety, structure, fire protection, or weather resistance, obtain qualified review before modifying the assembly. Keep a brief record of the observed condition and the action taken. Use the window assembly context detail to confirm which trade owns the connection and review.
Common questions
What does window assembly in construction describe?
It identifies a window feature, type, or condition. Its role depends on the frame, sash, glazing, opening, and surrounding wall detail.
What should be coordinated before ordering?
Check the schedule, operation, field dimensions, frame depth, glazing, flashing, trim, and access for cleaning and maintenance.
Does a perimeter seal guarantee a watertight window?
No. The window must connect to the wall's drainage and flashing layers as shown in the approved installation detail.
What is a useful first check when a sash binds?
Inspect alignment, hardware, clearances, and signs of opening movement. Record where it binds before selecting an adjustment.
Can an existing opening be enlarged?
That depends on the wall and project conditions. Confirm structural support and enclosure details with the responsible professionals.
Related reading
For nearby components and coordination details, see Tilted Windows in Construction: Meaning and Use; Window Stops in Construction: Meaning and Use; Cased Windows vs Uncased Windows in Construction Which.
Related tools
Where relevant, use WINDOWS TO WALL RATIO CALCULATOR. Check that the inputs match the project condition.
Conclusion
Window assembly in construction should be reviewed as part of a coordinated building assembly. Use the project documents, approved product information, verified field conditions, and qualified review to confirm fit and intended performance before work is concealed.

Leave a Reply
Want to join the discussion?Feel free to contribute!