
What Construction Finds a Segment Midpoint?
Introduction
In geometry, determining the midpoint of a line segment is a fundamental concept that has practical applications in various fields, including construction, engineering, and design. The midpoint is the point that divides a line segment into two equal parts. There are several geometric constructions that can be used to find the midpoint of a line segment, each employing basic tools such as a compass and straightedge. This article explores some of these constructions and their significance in the context of construction.
Bisector Method
Construction Steps
One common method to determine the midpoint of a line segment involves constructing the perpendicular bisector of the segment. This can be done by:
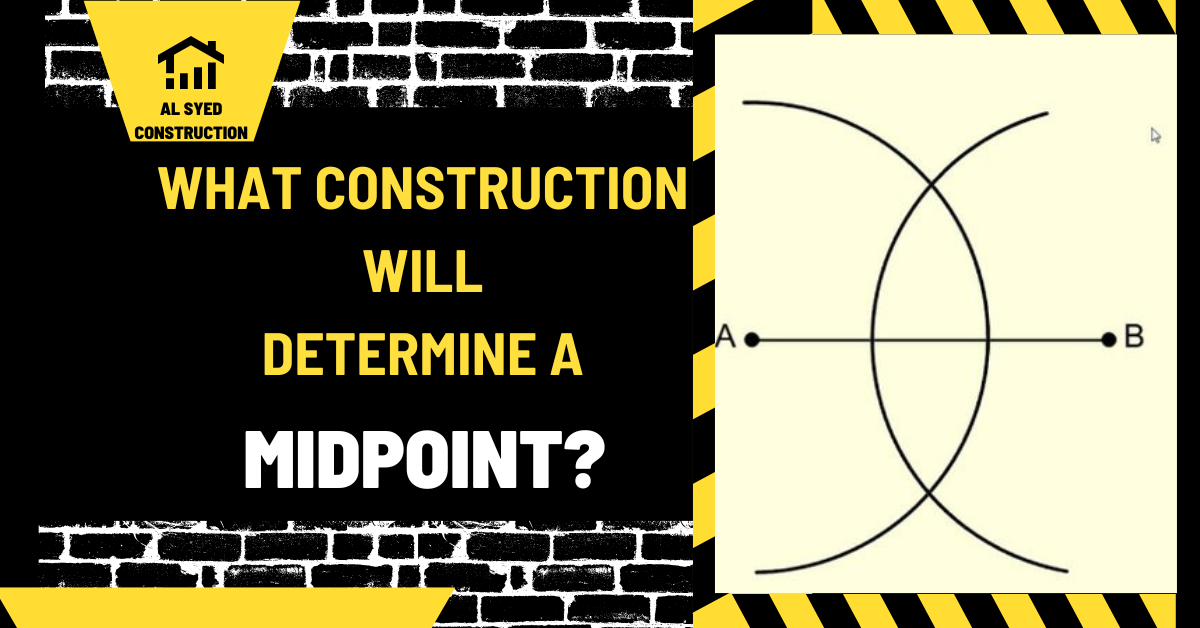
- Placing the compass at one endpoint of the line segment and drawing an arc that intersects the segment.
- Without changing the compass width, repeating the process from the other endpoint.
- Drawing a straight line through the points where the arcs intersect, which will be perpendicular to the original line segment and bisect it at its midpoint.
Significance in Construction
This method is particularly useful in construction for creating symmetrical structures and ensuring equal distribution of weight and materials. It is also employed in laying out foundations and dividing spaces evenly.
Midpoint Theorem
Theoretical Basis
In coordinate geometry, the midpoint theorem states that the coordinates of the midpoint of a line segment with endpoints (x1, y1) and (x2, y2) are given by ((x1 + x2)/2, (y1 + y2)/2). This theorem provides a straightforward way to calculate the midpoint in a Cartesian plane.
Application in Construction
In construction projects involving precise measurements and layouts, such as roadways or bridges, this theorem allows for accurate calculation and placement of midpoints, ensuring structural integrity and balance.
Use a perpendicular bisector to construct a midpoint
With a compass and straightedge, the standard construction for the midpoint of a line segment is to construct its perpendicular bisector. The point where that bisector crosses the original segment is equidistant from the two endpoints, so it is the midpoint. This method does not depend on measuring the segment with a ruler; it uses equal compass arcs and a straightedge to create a geometric proof.
Compass-and-straightedge steps
- Draw or identify the segment AB whose midpoint you need.
- Open the compass to a radius greater than half the length of AB. Keep this radius unchanged for the next two arcs.
- Place the compass point at A and draw arcs above and below the segment.
- Without changing the compass width, place the point at B and draw arcs that cross the first pair.
- Use a straightedge to draw the line through the two arc-intersection points.
- Mark the point where this line crosses AB. Label it M.
The radius must be greater than half of AB; if it is shorter, the arcs from the two endpoints may not intersect. A wider radius still works, as long as it is the same for both centers and the arcs cross. Use a light pencil mark and keep the compass point steady so the intersections are clear.
Why the construction proves the midpoint
Each arc intersection is the same distance from A and B, because both arcs were drawn with the same radius. Therefore, both intersection points lie on the perpendicular bisector of AB. The straight line through them is that perpendicular bisector. Every point on a perpendicular bisector is equidistant from the segment’s endpoints, so where the bisector meets AB, the two subsegments have equal length: AM = MB.
Another way to see the proof is to form two pairs of congruent triangles around the intersection. The equal compass radii establish equal sides, and the common segment between an intersection point and the midpoint is shared. The perpendicular bisector meets the original segment at a right angle and divides it into equal parts. A formal classroom proof may use the triangle-congruence theorem your course has studied; state the given equal radii and the shared sides explicitly.
Common mistakes and how to fix them
- Compass radius too small: widen the compass until arcs from both endpoints intersect above and below the segment.
- Changing the compass width: keep the radius fixed between the arcs centered at A and B.
- Using only one intersection: use both crossings to define the perpendicular bisector accurately.
- Drawing a line that misses the crossings: place the straightedge through the center of each arc intersection.
- Calling an approximate visual center a proof: use the equal-arc construction and explain why it guarantees equal distances.
Compass construction versus measurement
A ruler can estimate a midpoint, but measurement introduces tool precision and reading error. A compass construction establishes equality from the geometry of the arcs. In practice, pencil thickness and hand placement still affect the drawn marks, so the paper result is approximate; the mathematical construction itself is exact under ideal geometry. This distinction between theoretical construction and physical drawing is important in a proof.
If the task asks for the midpoint coordinates on a coordinate plane, a different method may be faster: average the x-coordinates and average the y-coordinates. That formula answers a coordinate problem; the compass method constructs the midpoint of a drawn segment without using coordinates. Check the wording of the assignment to choose the intended technique.
For another classical construction, see the guide to the angle-bisector proof. Both constructions use equal radii and intersecting arcs, but they solve different problems: one identifies a midpoint, and the other divides an angle into two equal angles.
Coordinate method and compass construction answer different tasks
On a coordinate plane, the midpoint formula averages the endpoints: if A is (x1, y1) and B is (x2, y2), the midpoint is ((x1 + x2)/2, (y1 + y2)/2). This is efficient when coordinates are given. A compass-and-straightedge task instead asks for a geometric construction and its justification.
For a horizontal segment from (2, 3) to (10, 3), averaging the x-values gives 6 and the y-values gives 3, so the midpoint is (6, 3). For a slanted segment, the same coordinate formula works, while the perpendicular-bisector construction works on the drawn segment regardless of orientation. Use the method requested by the problem.
Explain the proof with named facts
In a written construction, state that the compass width remained unchanged, so each pair of arcs has equal radii. Then explain that the intersection points are equidistant from both endpoints. Those points lie on the perpendicular bisector; the line through them crosses the segment at a right angle and divides it into two congruent subsegments. Do not merely write “it is the midpoint because it looks centered.”
If a teacher asks for a formal proof, identify the triangles formed by the arcs and the segment, list the equal sides, and cite the congruence rule your class has learned. The drawing shows the construction, while the proof explains why the method always works in ideal geometry.
What if the arcs do not intersect?
If the two compass arcs centered at the endpoints fail to meet, the radius is less than half the segment length. Increase the radius equally from both endpoints and redraw the arcs above and below the segment. Do not change the radius between the two centers. If the arcs intersect only on one side because of a drawing limit, use a larger sheet or extend the construction space.
Use two intersections rather than a single arc crossing to create the perpendicular bisector. The line through the upper and lower intersections is perpendicular to the segment because both points are equidistant from its endpoints. A single point alone does not define the bisector line.
How to check the finished construction
Use a ruler to measure the two subsegments as a visual check, but keep the compass proof as the justification. The measured lengths may differ slightly because pencil marks have width and hands are not exact. If the difference is large, check whether the compass slipped, the radius changed, or the final line missed an arc intersection.
Also check that the constructed line crosses the original segment at a right angle. A triangle or set square can provide a visual check, but the geometry follows from the equal-distance construction. The midpoint is the point on the original segment where the perpendicular bisector meets it; the arc crossings themselves are not the midpoint.
How the construction generalizes
The same perpendicular-bisector idea works for any two distinct points, not only a horizontal segment. It is useful for locating points equidistant from two endpoints, for constructing a line perpendicular to a segment at its midpoint, and for finding the center of a circle through the endpoints and another suitable point. The exact task determines which intersection or line you need.
In a formal exercise, follow the requested tools. If the prompt says compass and straightedge, do not use a protractor to place the midpoint. If it provides coordinates, the midpoint formula may be appropriate instead. The companion angle-bisector construction uses equal arcs to prove angle equality and is a helpful comparison.
Conclusion
Determining the midpoint of a line segment is a crucial task in construction, as it aids in creating symmetrical designs, ensuring balance, and facilitating accurate measurements. Whether using geometric constructions with a compass and straightedge or applying the midpoint theorem in coordinate geometry, the ability to find midpoints is an essential skill in the construction industry. Understanding and applying these methods can lead to more efficient and successful construction projects.



Leave a Reply
Want to join the discussion?Feel free to contribute!